


First Steps to a More Efficient Podcast Workflow
If you want a simpler way to mix a podcast with Audacity, here’s what I’ve learned lately.
Whether you’re creating a podcast or a screencast, how do you make your voice sound as professional as possible - without an expensive recording studio? Today I’ll show you how to do it using the free, open-source tool Audacity.
I do an increasing amount of audio work; whether that’s for my Free the Geek podcast, technical training videos, or longer courses. So it’s important to me that I sound professional, and not like I’m all alone in a room.
I’m not saying I want to sound like I have access to a professional recording studio. As it’s nice to still have a slightly more relaxed sound. So in my never ending search for that perfect sound, I’ve come across a reliable process which works for me.
Best of all, it’s using Audacity, which is my all-time — favourite — audio editor. If this is your first time hearing about it, Audacity is an open source (and free) application for recording and editing audio.
It has a very healthy range of features; but here’s a short list:
I’ll be honest, at first I was a bit dubious about using it, thinking it wouldn’t give me the kind of sound I wanted, instead preferring stick to the “safe” route of using GarageBand. But after some experimentation, I’ve found that Audacity’s clearly the better choice.
Honestly, given I’ve been in open-source for so long, I should hold my head in shame for not using it sooner. But hey, using it was a bit of a learning curve. Or did I just tell myself that?
In saying that though, it’s not that much of a learning curve. To be honest, what I had to learn wasn’t the Audacity UI, but audio terminology.
Not coming from a studio or music background, terms such as compression, normalization, high pass, and low pass were all gibberish to me. But once I gained a basic understanding of some of these terms, everything else started becoming rather natural.
Anyway, I’ve rambled a bit. Today I’m going to show you how I took a basic recording and made it sound pretty polished — even sexy — using only a handful of Audacity’s effects.
This is a recording that I made up on the spot. It’s nothing special, but it allows for a clear base recording. You can hear that the room sounds a bit empty, with not much in the way of sound deadening or padding.
Now have a listen to the second one. Better? I’m confident you’ll agree. I kid you not; it’s not a different room or setup. It’s the same recording with a series of effects applied. Specifically, in order, here they are.
The first thing that we need to do is apply noise removal. Noise Removal, or reduction, is the process of removing certain noises, such as background noise, hums, whines, and taps from the recording. To do that, you first need to get a profile of the sound which you want to remove.
To do this, you select a section of the recording which reflects what you want to remove, then click Effect -> Noise Reduction... -> Get Noise Profile.
With the profile created, you then select the entire track, and click Effect -> Noise Reduction... -> OK.
Note: A tip I picked up from Cal Evans, is to always include 5 seconds of regular room or background noise at the start and end of a recording. This background noise can then be used as the base of the noise profile. Thanks, Cal.
Alternatively, you could use Audacity’s excellent Noise Gate functionality, which, in recent months, I’ve found works equally as well as noise removal.
The next thing that we need to do is to apply audio compression. Audio compression, or dynamic range compression, reduces the difference between loud and quiet, of an audio waveform. Here’s an excellent description from TutsPlus (source):
Compression is the process of lessening the dynamic range between the loudest and quietest parts of an audio signal. This is done by boosting the quieter signals and attenuating the louder signals.
To apply compression, with the entire track still selected, click Effect -> Compressor -> OK.
After that, we need to apply equalization. Equalization is:
The process commonly used to alter the frequency response of an audio system using linear filters.
Why I’m using it is to both bring out the bass in my voice, giving it a rounder, deeper, bassy sound, as well as adding some treble to it, for extra crispness and vocal clarity.
To apply compression, with the entire track still selected, click Effect -> Equalisation.
In the popup window, near the bottom, click “Bass Boost” from the dropdown box next to “Select Curve“. Then click OK.
To apply compression, with the entire track still selected, click Effect -> Equalisation.
In the popup window, near the bottom, click “Treble Boost” from the dropdown box next to “Select Curve“. Then click OK.
With equalization applied, the last step we need to take is to normalize the audio. Quoting Wikipedia, normalization is:
Audio normalization is the application of a constant amount of gain to an audio recording to bring the average or peak amplitude to a target level (the norm).
In short, the key reason why I do this is to attempt to ensure that the entire track stays, roughly, at the same volume level. Everybody has natural variances when they speak, as well as other reasons why some sections will be louder or softer than others.
This fact is exacerbated when you’re recording audio at different times, as the sound is, without a very controlled environment and recording process, going to be different. So when you want the final piece to be consistent, you use normalization.
To apply normalization in Audacity, with the entire track still selected, click Effect -> Normalize.
Then set “Normalize maximum amplitude” to -6.0 dB.
Then click OK.
Doing all these steps by hand is fine, that is, if you’re either experimenting or applying them as a one-off. But applying them over and over again manually is extremely inefficient and time-consuming.
Gladly, Audacity allows you to create effect chains, which you can apply with the click of a button. Let’s create one for composed of the effects which I’ve outlined.
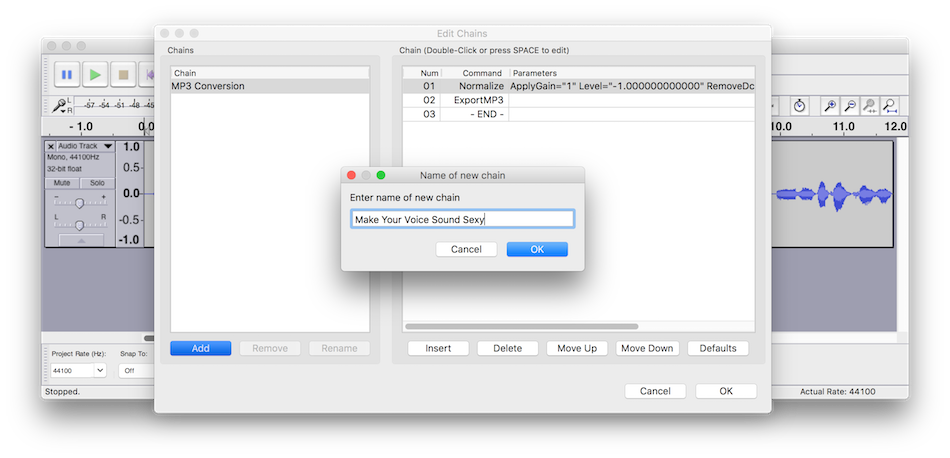
To do that, click File -> Edit Chains..., which popup the “Edit Chains” window.
In the lower left-hand corner, click “Add”, and give your chain a name, and click “Ok”.
Next, at the bottom of the right-half of the “Edit Chains” window, click “Insert”. From there, scroll through the commands and choose “Compressor”, then click “Ok”.
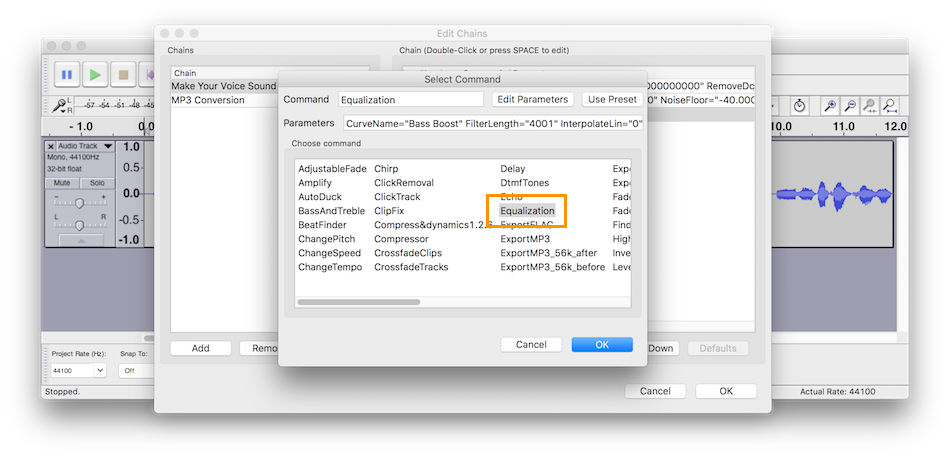
Next, scroll through the commands and pick “Equalization”, but this time click “Edit Parameters”. You’ll see the same dialog as you would have when you were applying the effect manually.
Click “Base Boost” at the bottom and click “Ok”, and click “Ok” again to add the effect. Next, add “Equalization” again, but this time, when you open “Edit Parameters”, choose “Treble Boost”. Then finish adding the effect as before.
Finally, add the “Normalize” effect. As with equalization, click Edit Parameters and, as before, set Normalize maximum amplitude to -6.0 dB. Then, finish adding the effect, and the chains finished, so click “Ok” one last time.

To use a chain, you have to “Apply” it in Audacity’s terms. So, open a recording, click “Apply Chain”, and in the “Apply Chain” dialog which opens, pick the effect chain to use, and click “Apply to Current Project”. That will then apply all of the effects, with the parameters supplied, in the order in which you set them up, to your current project.
And that’s how you can use Audacity to make an average recording sound far more professional. If you want to do even better, make sure you’re using a decent microphone, such as my personal favourite one, the MXL 990.
Just a reminder, if you’re not male, perhaps skip on the bass boost. But then, you already knew that, right? If you’re an audiophile, or do voice recordings, what is your process for making your voice sound at its best? Share your thoughts in the comments.
If you want a simpler way to mix a podcast with Audacity, here’s what I’ve learned lately.

If you need to adjust the volume of a specific section of a track in Audacity, the most powerful and flexible way to do so is by using the Envelope Tool. In this post, I show you exactly how to do so.

If you want to create a great quality podcast, you need to have great audio. And to have great audio, you need to remove all the things that distract your listener, and make your audio sound less than professional; such as breaths and lip smacking. One of the easiest ways to do this is to use Audacity’s Noise Gate functionality. Come learn what it is and how to use it.

Last week, I traded in my Blue Yeti USB microphone for an MXL 990 XLR mic. I’m beyond happy with the increase in quality. Here’s the backstory.
Please consider buying me a coffee. It really helps me to keep producing new tutorials.
Join the discussion
comments powered by Disqus